Using controls on worksheets
Content
Introduction
As a frequent spreadsheet user, you will be familiar with the concept
of using data entry cells to feed your model with input.
To ease data input, you can use the Data, Validation option (which is
NOT discussed in this article).
Sometimes it is more convenient to be able to change the input of your
model by using controls you can interact with using e.g. your mouse. Excel
offers a range of controls to do this, such as dropdown lists, spinner buttons,
option buttons and the like. These user interface elements are called controls
-after all, they allow you to "control" Excel-.
This article shows you how you use the form and control toolbox (ActiveX)
controls.
Where to find the controls
Showing the Developer tab on your ribbon
Making sure the Developer tab shows up is quite easy
Note that there are two groups of controls:
- Form Controls
These are the most reliable controls, but they do not offer much flexibility
regarding formatting.
- ActiveX Controls
These are more versatile, but also less reliable. They have the annoying
tendency to move around and change size without your consent.
Two groups of controls;
the differences
By now it is apparent that there are two distinct series of controls:
Those from the forms group and those from the Control toolbox (named ActiveX
controls in Excel 2007 and up).
Pro's and con's
The table below lists some advantages and disadvantages of both control
sets:
Control type
Form controls
ActiveX controls
Advantages
- Simple to use
- Can be used on chart sheets
- Assigning control to a macro is simple
- Little known problems
- Lots of options
- Lots of events (VBA)
- Lots of formatting options
- Lists return the selected value rather than the
index number
Disadvantages
- Lists return the index number rather than the selected
value
- Cumbersome to use one macro for multiple controls
- Sometimes cause of trouble with file corruptions
Which should you use
By now you'll be wondering which set you should use. Generally speaking,
I recommend using the controls from the forms toolbar. If you have specific
needs regarding formatting which cannot be achieved using the forms controls
(or if you want to program events in VBA), then you'll have to switch to
the ActiveX controls (control toolbox controls).
Inserting controls
Inserting a control on your sheet is very simple: Just click the control
you need and drag a rectangle on the sheet at the position where you want
the control to appear. You can also just click on the sheet and have Excel
decide what dimensions to use for the control.
If you hold down the alt key when you click on the worksheet,
then the control will be aligned to the cell grid. You can also hold the
alt key when you are dragging the control or resizing the control to have
it snap to the grid. This is a quick way to ensure your controls are nicely
aligned and of equal size.
Double click a control on the toolbar or on the Insert controls
dropdown if you want to draw multiple copies of that control. Click that
control again (or any other control) to get out of that mode.
Overview of the available controls
The table below shows which controls there are and describes each one
shortly.
Control name
Control use and remarks
Label
Add a label next to other controls.
Frame
Use this control to group other controls. OptionButtons
placed within a frame work together.
Button (CommandButton)
Start a macro
CheckBox
Set an option, Select multiple options from a list of options.
OptionButton
Select one option from a (short) list.
ListBox
Select an option from a list. Multiple options are visible
at the same time.
ComboBox
Select an option from a list, only the selected option is
visible.
ScrollBar
Quickly change numeric values.
Spinner
Change values step-by-step easily.
ToggleButton
Toggle status. This control is not recommended, I advise
to use either a checkbox or a set of two OptionButtons.
Detailed description of the
controls
Label
The label control is the simplest control available, all it can be used
for is to display descriptive text. Use this control if you want to add
some explanatory text to another control.
TIP: You can make sure the label text is derived from a worksheet
cell. To do so, select the label and then click in the formula bar and enter
a reference to the cell. See fig. 5.
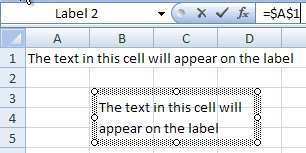
Fig 5: The text on a label drawn from a worksheet cell
Frame
You can use a frame to visually group controls with a shared purpose.
Apart from that, the frame control has a specific function for option button
controls (see the appropriate section about them). You must start with drawing
the frame control before adding the controls you want placed "inside" the
frame. To make this a painless process, start out by drawing a relatively
large frame (you can make the frame smaller later on). After that, draw
the controls inside the frame:
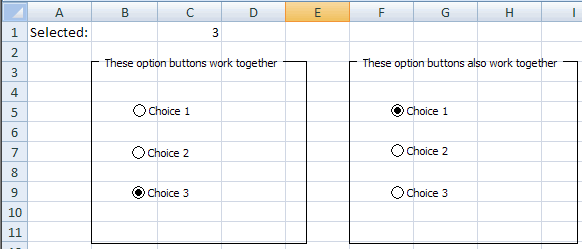
Fig 6: Frames with OptionButtons within.
Button (CommandButton)
Buttons or CommandButtons are used to start VBA code (macro's). If you
draw a Button from the Forms toolbar on a sheet, Excel will prompt you for
a macro to run when the button is clicked (fig 7). If you have not written
a macro yet, then you can type the macro's name and click the "New" button
to have the (empty) subroutine created for you:
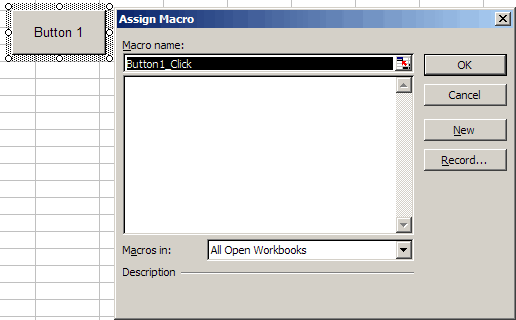
Fig 7: Excel asks you what macro to run when the button
is clicked.
If you used the CommandButton from the Control toolbox, you need to double-click
the button (in design mode) to access its VBA click event. Code for control
toolbox (ActiveX) controls is typically written in the code module behind
the sheet they are placed on.
TIP: If you want to change the properties of a control from
the control toolbox (an ActiveX control), then you must put your sheet into
"Design mode". You can find this button on the "Developer" tab, within the
"Controls" group. When you want to start using the controls, click the same
button to get out of design mode.
CheckBox
Typically, a checkbox control is used to enable the user to turn something
on or off, or to answer a yes/no question. The checkbox always stands on
its own, allowing multiple options to be selected (checked) at the same
time.
OptionButton
The option button is very similar to the check box, but only allows mutually
exclusive choices to be made; in a set of option buttons, only one option
can be "checked". If you take no specific action then all option buttons
on one sheet will be treated as one single group. It is possible to have
multiple groups on a sheet. The method to achieve this differs between the
two sets of option buttons.
The method to tie an option button to a cell differs between the two
types too.
Forms option button
To group option buttons from the forms toolbar, first draw frames on
your sheet. Then draw the option buttons INSIDE the frame:

Fig 8 : Two frames with option buttons.
Option buttons from the forms toolbar share their linked cell. The value
returned to the cell is the index number of the selected option. Note that
the index will match the order in which you created the option buttons.
To select a control from the forms toolbar (for example to
be able to move the control), either right-click the control or control+click
it. To select multiple controls to change their properties in one go, hold
control while clicking them.
Group controls you want to keep together, for example those
within a frame, by control+clicking them in turn and then right-clicking
on one of their edges and selecting "Grouping", "Group".
Control toolbox option button (ActiveX)
The option button from the Control toolbox toolbar (ActiveX) has a special
property to set up which work together, called the Groupname property:
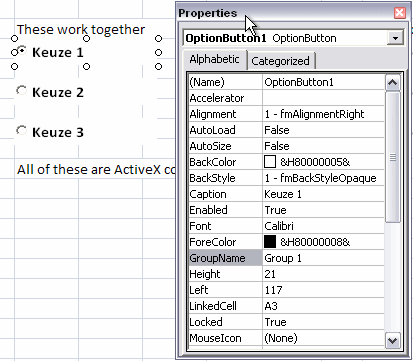
Fig 9: Groupname property of the ActiveX OptionButton control.
If you do not change this property, all option buttons on a sheet work
together as a single group.
ActiveX option buttons all have their own linked cell, which will receive
the checked state of their parents as a True/False value.
TIP: You can get at the properties window of the controls
by right-clicking a control and selecting "Properties". You can also click
the appropriate button on the Control Toolbox toolbar. In Excel 2007 and
up, you'll find that button on the Developer tab, within the Controls group.
ListBox
If you want to enable your user to select an option from a list you can
use a list box. Of course you could also use a set of option buttons for
this goal, but making a set of option buttons dynamic (for example if you
want to be able to expand the number of choices) is cumbersome. If you have
a limited set of available choices (rule of thumb: no more than 5), use
option buttons. If there are more, use a list box or a combo box control.
You can either have the control pick up the list from a range of cells,
or add the choices to the list box control using VBA. This is done by entering
the corresponding information into the ListFillRange or Input range property.
If your list of choices resides on a different worksheet from the one your
list box is placed on, you must define a range name for the list. Do so
by selecting the list and hitting control+F3. In Excel 2007 and up you then
need to click the "Add" button. Enter a name for the list and click OK until
you're back in Excel. After that, you can enter this new range name in the
appropriate property of the control.
The second most important property is the LinkedCell (cell link), this
cell will receive the result of selecting an item in the list box:
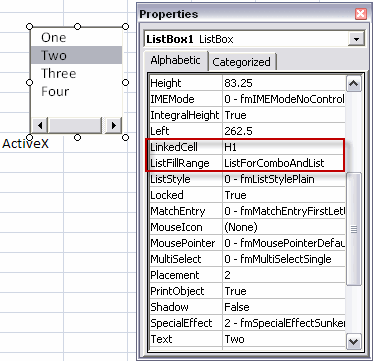
Fig 10, Two important propeties of the ActiveX list box
control.
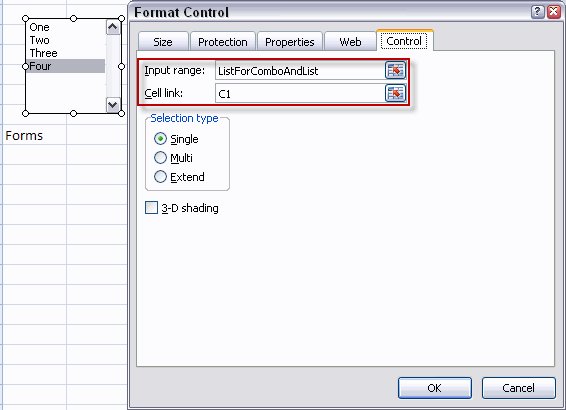
Fig 11: Two important properties of the forms list box.
Note that the list box from the forms toolbar will show the index of
the chosen item in the cell, whereas the control from the control toolbox
returns the actual value to the cell. For the list box from the forms toolbar,
use a formula like this one to get the actual value:
=INDEX(ListForComboAndList,C1)
You can set the list box to "Multi" or "Extended" to enable multiple
selections. In that case, the linked cell will show either a zero for the
list box from the forms toolbar or #N/A for the control toolbox list box
control. You will have to use VBA to read what items have been selected
and act accordingly.
ComboBox
A combobox is very useful when there are many values to choose from and
when you only want to show the chosen item. With the combobox from the Control
toolbox you can dynamically add items to the list -using VBA- when the user
types a new item in the box instead of selecting an existing item. The combo
box form the forms toolbar does not have this possibility: the user is limited
to the choices available in the list.
The two important properties LinkedCell and ListFillRange operate in
the exact same way as for the list box control.
ScrollBar
The most important reason to use a scrollbar is to be able to change
a value very quickly. The user can drag the scroll button, click next to
the scroll button to change "page" or click the arrows to increase or decrease
the value stepwise.

Fig 12: Scrollbar with linked cell.
A vertically placed scroll bar works opposite compared to
a spinner control. Clicking the up arrow on a spinner increases the value;
clicking the up arrow on a scroll bar decreases the value. In my opinion,
the former is more intuitive. If I need this vertical setup, I prefer to
use a spinner over a scroll bar.
A scroll bar enables you to change the value in two ways. The "Incremental
change" is performed by clicking the arrow buttons, the "Page change" is
performed by clicking next to the scroll button. See fig. 13:
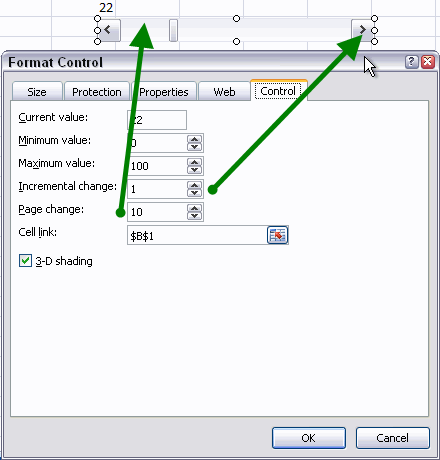
Fig 13, Two levels of step sizes.
These properties have a different name for the scroll bar of the Control
Toolbox toolbar (ActiveX) "SmallChange" and "LargeChange" respectively,
see figure 14:
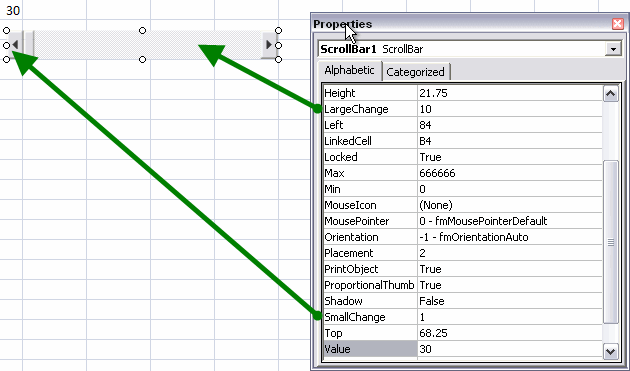
Fig 14, Setting properties of the ActiveX controls scroll
bar.
Scroll bars can only work with integers. The range you can use differs
between the two families. The forms control ranges from 0 to 30,000. The
ActiveX control can go as high as 666,666.
If you need steps less than 1, then use a calculation. For
example if you need a step size of 0.5, divide the linked cell's value by
2.
Spinner
If you want to be able to quickly change a cell value stepwise, the spinner
is the place to be.
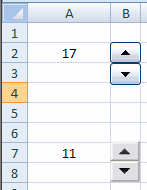
Fig 15: Spinner controls.
Setting up spinner controls works identical to the scroll bar control,
using the same properties. Of course the spinner does not have a Page change
(LargeChange) property.
TextBox
There is only one text box control, member of the ActiveX family of controls.
I find this control to have little use, because you can simply use a cell
and enter text into the cell directly.
ToggleButton
The last control I discuss here is the toggle button. This is another
example of a control that is only available through the ActiveX family of
controls. In my opinion, this control is ambiguous. It could be used to
either indicate an action, or a state. You could use a control like this
to change the page setup of a sheet from portrait to landscape and vice
versa. Disadvantage of this control is that the state and action paradigm
are conflicting, especially if the two states have a different name (like
in the example).
Suppose you want to enable toggling between portrait en landscape. You
might be tempted to use a toggle button, which has some VBA attached to
it to set the option and which updates the caption of the control. What
does the caption indicate, the current status, or the status AFTER clicking
the toggle button?
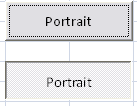
Fig 16: Ambiguity when using a toggle button: which one
indicates we're in Portrait mode?
Due to this ambiguity a toggle button is only useful to indicate an on
or off state for a property which has the same name in both states. For
this goal, a checkbox is to be preferred. If there are two mutually exclusive
choices, consider using two option buttons.
Interaction between
controls and worksheet cells
Each control can be tied to a cell and thus (by using that cell in your
formulas) affect your spreadsheet model directly and drive interactivity
between your model and the user. For the forms controls, you access these
options by right-clicking the control in question and selecting "Format
control". Each control offers its own set of options, which are located
on the "Control" tab. (see figures 11 en 13). Similarly, you can change
the properties of the Control toolbox (ActiveX) controls using their properties
window.
Conclusion
Excel is a very flexible instrument to perform analyses and what-if scenario’s.
You use formulas in cells with one or more input cells to calculate the
various situations. To ease working with different values and/or choices,
you can put the controls from either the Control toolbox or the Forms toolbar
to good use. Proper use of these controls make your models easier to use.
The controls also enable you to ease data entry and at the same time
improve data quality by minimizing the risk of wrong entries. For "day-to-day"
use, I recommend the Forms controls. If there are specific options you need
which are not offered by the form controls then you can also implement the
Control toolbox (ActiveX) controls.