Creating webpages with Excel Web App mashups
Pages in this article
-
Preparations
-
JavaScript
-
Web controls
-
Demo with controls
-
Dynamic demo
-
Conclusion
Prepare an Excel file to create a Mashup
First of all, you need to create a file on your OneDrive which is
public, i.e. everyone can "see" that file. Alternatively, you can also
create a public folder. All files in that folder can be viewed by
anyone.
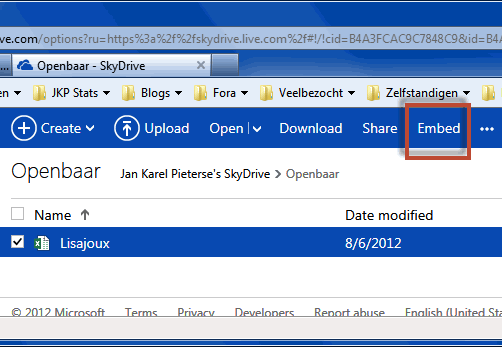
A folder in my Onedrive.
Once the file is uploaded, check the box just before its name and
then click the "Embed" link shown in the screenshot above.
The window shown below opens up:

The embed screen
If you want to embed a static file and do not need to change the size
of the box the embedded file will be in on your page, just click the
Copy link highlighted in the screenshot. The code will look similar to
this:
<iframe title ="Preview" scrolling="no"
marginheight="0" marginwidth="0" frameborder="0" width="402px"
height="346px" style="padding:0;background-color:#fcfcfc;"
src="https://r.office.microsoft.com/r/rlidExcelEmbed?su=-5430218907388983095&Fi=SDB4A3FCAC9C7848C9!285&ak=t%3d0%26s%3d0%26v%3d!AJHqJpkd-Q5axR8&kip=1"></iframe>
More often however, you will want to change some settings, such as
whether or not the visitors of your site can interact with the file.
Click the "Customize this embedded Excel workbook" link highlighted
above. Another screen pops open:
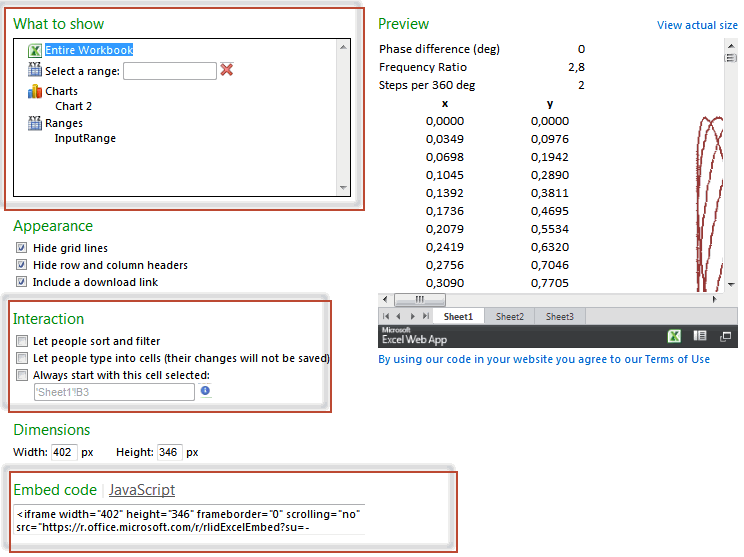
The Customize embedded Excel workbook dialog
I have put a red rectangle around some parts of this screen. The top
box has the items in your file which you can select. The Excel Web App
will only show the item you select in the embedded file on your website.
Very convenient if you only want to show a chart.
The second box highlights one of the interaction restrictions you can
put into action.
Once you have the settings you need, you can copy the needed HTML
code from the textbox at the bottom. Note the JavaScript link; this is
what the rest of this article will use to build communication between
the web page on the client and the Excel web app control.